How To Build A WordPress Website On Namecheap In 10 Minutes 2022
Welcome to Flippstack, If you are looking to start blogging and start earning money online in 2022, then you need a website where you can create content and promote your business online. In this article, we will be walking you through the steps on how to set up your WordPress website using Namecheap.
According to research WordPress is one of the most widely used website creation tools, powering over 41% of all websites on the internet.
My name is Okpara Kenneth, and I’ve been working in the internet space for over two decades. What I do is share educational and high-quality content about digital marketing, including real case studies and extensive research, to help you and I make a living online, as well as understand what works and what doesn’t, so we can all win together.
This tutorial will cover how you can easily create a WordPress website using Namecheap In 10 Minutes in 2022. All that is required from you is to read in between the line and follow all the steps in this article and you are good to go. if you READ till the End I HAVE A GIVEAWAY FOR YOU.
This Entire Process Is Just A 6 Step Guide:
Register a Domain
Set Up Hosting
Connect Your Domain and Hosting
Accessing your cPanel
Install WordPress using Softaculous
Log into WordPress and Choose a Theme
Edit Site Details
Set Up Website Menu
Publish your first content
PROPOSED OFFER
Reasons Why You Need To Have A Website
Having a website will attract new customers to your business and make you more money
Add instant credibility to your business simply by having a website.
Generate passive income (make money in your sleep – keep reading)
Gives you the freedom to work from anywhere
It’s ridiculously easy and affordable (and fun)
How To Build A WordPress Website On Namecheap In 10 Minutes 2022
Step 1: Register a Domain
In this first step, you need to register your domain. Registering a domain for your website is like choosing your street address. Below are a few things to consider when choosing a domain:
Moving over to step 2 means you now have your domain name successfully registered, now you need a place for your website to live. While there are several different options for your hosting here on Namecheap, we’ll assume for this example you’re going to use Shared Hosting – a great place to start out for most websites, as it’s both economical and easy to use.
Purchase the service that best suits your needs, and keep an eye out for Namecheap emails with further information.
Step 3: Connect Your Domain and Hosting
After you have successfully purchased your Hosting plan, Now you need to connect your domain with your hosting. To accomplish this, you will assign your Namecheap nameservers to your domain. This is a lot like sending out a Change of Address card to let the post office know where to deliver your mail.
Updating your nameservers is a simple process that you can manage through your Namecheap Account Panel. Namecheap offers step-by-step instructions on how to easily make this happen.
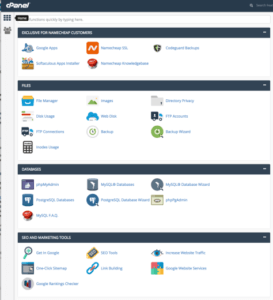
Step 4: Accessing your cPanel
The next thing to do is to access your cPanel which will enable you to install your WordPress website easily. Below are the steps to access your cPanel from your Namecheap dashboard:
3. On the dashboard, click on Hosting List which is located at the left side panel
4. On the next page, you will see the “Go To cPanel” button located beside your domain name, click on it to access your cPanel.
The cPanel is your dashboard for your hosting account. Here you can view your bandwidth and disk space usage, create subdomains, manage web email, use FTP to transfer files to and from your site, access databases, and install content management systems (like WordPress) or other software on your website.
Step 5:Install WordPress using Softaculous
In this step, we will be installing WordPress using one of the Namecheap tools called Softaculous. Softaculous makes it very easy to install your WordPress website.
Here are a few steps you’ll want to follow:
Log into your cPanel and locate the Softaculous App Installer. You will see an option within Softaculous to install WordPress.
Assuming you want your URL to be “yourwebsite.com,” you can leave the In Directory field empty.
Set your WordPress username and password here. These should be different from your cPanel login or your Namecheap account. Be sure to write these down and keep them safe. You will need these credentials to log into WordPress when you’re done with this step.
Step 6: Log into WordPress and Choose a Theme
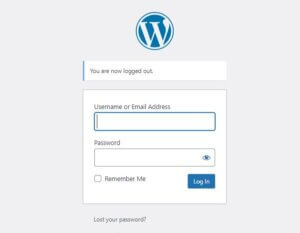
Once you have successfully installed your WordPress, now is to Login into your WordPress dashboard and start building your site.
Go to your site address (the address specified in “In Directory”) and add /wp-admin (e.g. http://yourdomain.com/wp-admin).
(Note: if you just registered your domain and/or just connected it with Namecheap hosting, you may need to wait a bit for the domain name servers to propagate. If you can’t see anything yet, don’t panic!)
When you are asked for your username and password, use the details you specified when you installed WordPress. If everything has been set up correctly, when you log in you should see your WordPress Dashboard.
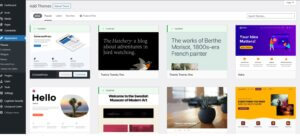
Once you’re logged in, you can install a theme by navigating in your Dashboard to the left-hand column and choosing Appearance > Themes.
Step 7: Edit Site Details
A website’s name and slogan are frequently visible when you visit it. This is not the same as the URL (which includes a.com,.net, or other suffixes), but it may have the same name.
To Edit The Site Name & Tagline:
Click/ hover on ‘Settings’ from the dashboard menu
Click on ‘General’
Add a Title
Add a Tagline
To Edit The Link Settings:
Under ‘Settings, ’click on ‘Permalinks’
Under the ‘Common Settings’ section, click on the ‘Post Name’ button
Save your changes
Step 8: Set Up The Homepage Menu
Your website can have a variety of menu options, depending on which theme you choose. Some themes only enable you to have one menu option, while others allow you to have multiple. I will prefer you use the Neve theme
We’ll discuss how to set up the major menu for a more consistent approach, as every theme will have one.
So, What Is The Purpose Of The Menu?
The menu, which is commonly displayed as a strip of clickable links at the top of your website, allows people to reach sections of the site that you deem important. It aids with site navigation and improves the reader’s overall experience.
Many website owners use this menu section to display information such as their contact information, home button, terms and conditions, privacy policy, and more.
You can go that route as well, or you can let your menu link to the site’s categories.
How you build up your menu depends on the approach you choose to take, but the principles remain the same:
Hover/click on ‘Appearance,’ then ‘Menus,’ from the dashboard.
You will have the choice of adding only pages, categories, or posts to your menu, or a combination of them.
Choose the things you’d want to see on the menu. It’s worth noting that this may be modified at any moment, so there’s no need to get it just right the first time.
After you’ve made your choices, click ‘Add to Menu.’
Check the ‘Primary Menu’ box at the bottom of the page. If your theme allows multiple menus, you’ll see them here as well.
Select ‘Save Menu’ from the drop-down menu.
On the home page, your menu should now be visible.
Step 9: Fill Your Website With Content.
A website’s content is an essential component. You’ll have to make pages and posts.
Go to the sidebar in your WordPress dashboard and click ‘Pages’ -> ‘Add Page’ to create a new page for your website. Your website can have as many pages as you wish. Homepage, About Us, Contact Us, Privacy Policy Page, and so on are some of the preferred pages.
Similarly, you must post content on these pages in order to contribute content to them. To add content to your page, follow these instructions.
In your WordPress dashboard, go to ‘Posts’ in the sidebar.
To begin, go to ‘Categories’ and create a new category. For example, marketing, business, technology, and so on.
Next, click the ‘Add New’ button to add material (a new post) to your website.
But if you still need help, I and my team can help you set everything up and running within 10 minutes for you just for FREE (JUST to assist you in YOUR Blogging Journey) that is the lease we can DO!


Pingback: How to Protect Site Against DDoS Attacks And Ensure Stability - FlippStack